Tuesday, September 6, 2011

Thai Basil Flowers


I have an assortment of four different basil plants growing this year in the garden with Thai Basil being one of them.  The plants are beginning to go to seed at the moment, so I've been plucking the flowers off in an effort to extend the life of the plant.  One day, Paul was outside and picked some of the Thai Basil flowers.  He noticed that they smell differently than the basil leaves.  He brought them in the house and it smelled fantastic!  The flowers actually filled the kitchen with a wonderful aroma of sweetness combined with anise or licorice scent.  Right now, I just have these in a small bowl on our kitchen table as a type of potpourri, but I started looking around the web to see if they can be used for anything else.  Here's what I found:

Thai Basil Blossom Ice Cubes, for Thai Basil Mojitos - at Pitchfork Diaries
Thai Basil Information - at Thai Food and Travel
As a Garnish or in a Green Salad - at Jugnoo Farms
Lemon Myrtle Star Cookies (can be easily made vegan!) - at Tasty Kitchen
Thai Basil Flowers and Tomato Salad - at Cooking on the Weekends
Sesame Slaw with Thai Basil Flowers - at Hogtown Homegrown
Thai Basil Seed Drink - at Pranee's Thai Kitchen

I also read that you can combine dried thai basil flowers with grated orange rind and make it into a tea.  I can't find the website where I originally read that, but thought I would list that as an option!

I haven't quite decided what I will do with my Thai Basil flowers, but for now, they look awfully pretty on my kitchen table and smell absolutely wonderful!

Monday, September 5, 2011

A Summer of Backyard Vegetables (Part 2)

Here is the continuation from yesterday's blog post, A Summer of Backyard Vegetables.  In this blog post, you can see how everything grew and turned out, despite making some mistakes earlier in the summer like planting tomatoes in a slightly shady location.  Figuring out where to grow your veggies in a new house is a bit of a trial and error process, and the best solution for us was to plant our tomatoes and peppers in a bright and sunny location in containers.

From July 25, 2011:

Sweet Pepper Carmagnola Yellow


Here is an update so you can see just how much our veggies have grown!  Pictured above are the Sweet Pepper Carmagnola Yellow, just beginning to turn yellow.  These peppers are absolutely ginormous! There are two of the biggest peppers growing on one plant, plus three other plants that are growing a few peppers on each of them.

Chinese Five Colour Hot Pepper

Here is the Chinese Five Colours Hot Pepper.  Some of the peppers are beginning to change from their first colour of purple to a creamy shade of pale yellow.  After that, they will turn pink, red and orange.  It will be fun to see them change colors as they ripen!  This plant seems to keep growing new peppers, so hopefully we will get a lot of them out of just one plant!
 
Variegated Fish Hot Pepper

This is the Variegated Fish Hot Pepper with its striped peppers.  They start off green with faint white stripes, and they are changing to be green and orange/yellow.  I believe that they will end up being orange and yellow when they ripen and are ready to be eaten.  It will be interesting to see how these ones turn out!  I have two of these plants and they have many peppers on them.

Cayenne Pepper
Here is the Cayenne Pepper plant.  Just one of the peppers is turning red but it won't take long for the others to turn from green to red.  This is the only Cayenne plant that I have as the other one unfortunately died.  Should still get lots of tasty hot peppers though!

Hungarian Hot Banana Peppers

Lots of Hungarian Hot Banana Peppers, ready to be picked and devoured!

Then, we have lots of tomatoes!  Thankfully, none of the tomato plants died when I had to transplant them - very lucky!  I am so glad that I moved them out of their previous shady location.  Even though we may not get as many tomatoes as we could have gotten had they been in the full sun the entire time, these tomato plants have really grown and have lots of tomatoes growing on them!  It may take a little longer for them to mature, but some of the tomatoes are starting to turn red!  And that is good, because I cannot wait to make my famous salsa and bruschetta bread!


* * *

From the beginning of August, 2011:


Fresh from my garden, here is my Chinese Five Colour Hot Pepper plant growing with peppers in all five colors.  They start out purple, then change to a creamy off-white, then yellow, orange, and red.  The red one must be just about ready to be picked and the orange one isn't too far off.  I haven't tasted these peppers yet but I hear that they are hot!

My plant is leaning a bit to the side so I should probably stake it.  Also, next year, I will be sure to plant my peppers in big pots like the tomatoes as I keep seeing that these pepper plants can grow quite a bit larger and bushier.  I am really happy that these peppers all seem to be growing really well, and I will have a great variety of hot peppers to eat throughout the rest of the summer!  This plant is quite beautiful with all of the bright colours.

* * *

And finally, from August 11, 2011:


The veggies are ripening and new ones are fresh to pick on a daily basis!  We had a couple of days with a good amount of rain coupled with some sunshine so lots of tomatoes and peppers are ready to be enjoyed.


Here are all of the peppers that we are growing and at least one of each of them were ready!  The one on the left is the Little Bells Sweet Pepper.  I had no idea that these grew to be so big!  We used it tonight in our dinner and it was delicious!  Since the pepper is so big, we ended up only using half of it, so the other half will be used in a salad tomorrow.  The other peppers in order from left to right:  Hungarian Wax Hot Pepper, Red Cayenne Pepper, Variegated Fish Hot Pepper, and Chinese Five Colours Hot Pepper.


Here are some of the tomatoes that I picked - Matt's Wild Cherry Tomato (the smaller ones) and Baxter's Bush Cherry Tomato (the bigger ones).

I ended up using a lot of the tomatoes and hot peppers to make my delicious garden fresh salsa!

I hope that you enjoyed this whirlwind tour of my vegetable garden, from start to finish over the summer!  We aren't nearly finished yet though, as I am still picking a whole bowl full of fresh tomatoes every single day from the garden even now that it is September. There are still some hot peppers left to pick, as well as a whole bowl of them sitting in the fridge waiting to be devoured.

Thank goodness for summer and growing your own veggies!

Sunday, September 4, 2011

A Summer of Backyard Vegetables (Part 1)

Since I just started this blog this past month, I thought I would take you on a whirlwind tour of my vegetable garden over this past Spring and Summer!  It was our first year at our house where we have an actual backyard to plant stuff, and we were unsure of how much sunlight certain areas received, how things would grow in the backyard, etc.  This year was certainly a learning experience all around and thankfully we had an abundance of fresh veggies!

Let me take you back to May 18, 2011:


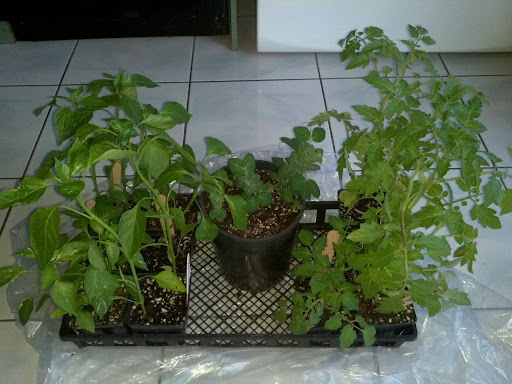
Searching around online for local organic vegetable plants was rather difficult. I wanted to buy plants that were non-genetically modified, organic and heirloom varieties. Not only would I love access to fresh veggies from my own backyard, but if I am going to the trouble of growing veggies, I would like them to be non-GMO and free of pesticides.

I visited the retail location of Urban Harvest and found an amazing selection of organic veggie plants and seeds. They have a wonderful philosophy and commitment to saving our seed heritage. They also only sell open-pollinated varieties so you can save your own seeds. Their selection is quite diverse with over 350 varieties of seeds and they have been operating for 15 years.

I picked up the following organic, heirloom, and even some endangered varieties: Sweet Pepper Carmagnola Yellow, Little Bells Sweet Pepper, Chinese Five Colours Hot Pepper, Red Cayenne Pepper, Hungarian Wax Hot Pepper, Variegated Fish Hot Pepper (apparently these will have stripes!), Tom Thumb Snap Peas, Matt's Wild Cherry Tomato, Rona Tomato, Baxter's Bush Cherry Tomato, and Principe Borghese Tomato.

I will be planting everything over the weekend, provided that we have good weather. I can't wait to start up my veggie garden again! A sure sign that Spring is here and Summer is around the corner!

I should also mention that the retail shop of Urban Harvest is in the West end of Toronto. They have their seeds at multiple retail locations near Toronto and you can order online as well. If you would like to purchase seedlings like I did, I highly recommend visiting their store. There are so many types of tomatoes and plants, you won't be disappointed!

* * *

A couple of days early, on May 16, 2011:


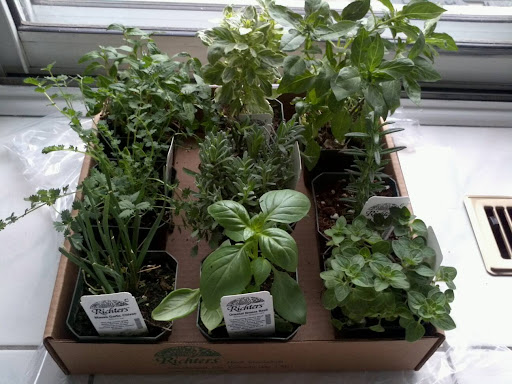
Today after work, I drove out to the country, beyond Toronto and Markham to Goodwood, Ontario. What's out there, you may ask? A wonderful gem called Richter's Herbs is worth the drive!

There are so many unique varieties of herbs and seeds there; everything and anything you could possibly want! They grow the herbs there and they don't use harmful pesticides, plus many plants are organic.

I can't wait to plant some of these outside, or transplant them to bigger pots. It will be wonderful to have access to fresh herbs again! I purchased: Pedro Perpetuo Basil, African Spice Basil, Oriental Breeze Basil, Rex Rosemary, Greek Oregano, Lady Lavender, Vietnamese Cilantro, and Salad Burnet. As for seed packets, I bought Cilantro, Chia, Thai Basil, plus Mizuna, Green Leaf French Purslane and Salad Bowl Lettuce to grow indoors as I am going to try to grow some microgreens.

If you're not in the area, they have an online catalog and they do mail orders! What an amazing greenhouse full of herbs (also, a friendly orange cat was following me around the greenhouse, who instantly captured my heart!). Now, just to buy my veggies soon and it will be time to plant my garden!

* * *

Then, on May 26, 2011, everything was fully planted:


The vegetable seedlings are fully planted and now they can grow into glorious plants with loads of fresh veggies waiting to be picked, right from my own backyard!  I only have a small space in the backyard where I can plant veggies directly into the ground, so I decided to plant the tomatoes there and do the rest in containers.  As you can see here, I have all of my peppers and herbs up on the deck.  I decided to buy some raised shelving units just so I didn't have pots sitting directly on the deck.  I found this shelf in the garage/automotive section of Walmart for a very low price of $29 - it is designed to be one 5-shelf unit, but I broke it down into a couple of shelves to allow the plants to get more sun.


Here are the tomatoes.  It is a bit tricky to see from the picture as there are tons of pink petals all over the ground.  Our neighbor has a beautiful large cherry tree in their backyard that is blossoming, and the tree shades part of our backyard.  We have tons of pink blossoms all over our backyard and it looks so pretty!  Hopefully the tomato plants don't mind!


Two balcony container planters full of herbs.  This is my first time growing veggies in the new house and I have had great successes in the past, so hopefully this year is as good as ever!

* * *

Then, on July 4th, 2011, I call this one: "Learning from Vegetable Garden Mistakes":


This was our first year in the new house and I had to adjust the way that I grow my veggies to the new backyard.  With that said, I made plenty of mistakes this year that I will be learning from for next year!  I think that everything is starting to grow a bit better now that I have tried to correct these mistakes for the rest of the growing season, but some plants may not survive - time will only tell.  Here is a wrap-up of the mistakes I made so you won't make the same errors that I did!

1.  Make sure everything gets enough sunlight.  I planted all of my tomato plants in a wonderful bed in the ground that ended up being shaded by the neighbour's giant cherry tree.  I thought the tomatoes would have gotten more sun than they did.  The plants themselves looked beautiful, but this resulted in very little fruit being produced on the plants.  In an attempt to correct this mistake, I dug up all of my tomato plants after they had been in the ground for over a month and transplanted them to pots.  It is hard to tell if the tomato plants will survive at this point.  I may not get tomato plants this year, but I will know to just plant them in containers for next year where they will receive full sun.  Lesson learned:  Make sure your tomatoes (and peppers!) get at least 8+ hours of full sunlight, especially the hot afternoon sun.

With that said, I had my peppers in a spot where they did receive full sun, but I moved them to a spot where they get full sun for longer and they also seem like they are growing better.


2.  Make sure you purchase the correct soil for your containers.  I bought a cheap potting soil at Walmart thinking it would be okay and it wasn't.  There was very little (if any) nutrients in the soil, and my peppers suffered in the beginning.  I transplanted some of the peppers to a better potting soil with nutrients in the soil and they seem much happier now.  Then, after talking to some really nice employees at a local garden centre, I found out that it is fine to plant your vegetable garden in containers using triple mix (peat moss, manure, soil mixture).  This way, the soil has an adequate amount of drainage, the plants get the nutrients they need, plus the soil is a bit heavier than potting soil so you don't need to water nearly as often.  Potting soil is good to use, but triple mix works as well, so I'm glad that I learned about that tidbit of information!


3.  Make sure your peppers aren't in a windy location.  Sometimes this is out of your control, but I think that my peppers were in a windier spot being up high on my deck as opposed to on a lower level.  One of my pepper plants ended up dying due to a combination of poor potting soil (see above) and being a tall plant in a windy location.  Try to shield your plants from the wind as much as possible, especially when the plants are still small and don't have as strong of a root support system.


With that said, I have learned from these mistakes for next year and I am starting to get some nice looking peppers at least!  Not too sure about the tomatoes yet, but hopefully they survive and can at least produce some tomatoes this year.  I love make a fresh salsa each year with tomatoes from the garden, so I'm hoping I can do that again.  One more thing - if you are going to be planting in containers, make sure the plants are off the ground in some way so they can drain easier.  Mine are lifted off the ground on some plastic shelves that have spaces in them for drainage.

Stay tuned for Part 2 of "A Summer of Backyard Vegetables" to be posted tomorrow!

Saturday, September 3, 2011

Refrigerator Pickles

Refrigerator Pickles - Two Weeks Ago

I was reading some vegan blogs and saw that a few different bloggers had made "refrigerator pickles" using simple ingredients and non-complicated methods.  I decided to give it a shot a couple of weeks ago, so I have the official "before" and "after" results!  You need to combine the ingredients in a jar and let it sit for two weeks in the refrigerator before consuming.  That was tricky as we kept being tempted by these delicious looking pickles in the fridge.  You must wait at least two weeks for the delicious flavors to be soaked into the cucumbers and believe me - it was worth the wait!

Refrigerator Pickles - Two Weeks Later!

These do not taste like average pickles that you would buy at the grocery store.  They taste very crunchy and fresh like a cucumber, but tangy and spicy like pickles!  I find that they even have a very subtle sweetness to them.  After tasting them, Paul told me that they were the best pickles he's ever eaten!  If you love pickles but don't want to go to all of the trouble of making traditional homemade pickles, I would definitely give this a shot. 


Here's what you need:

1 cucumber or 2-3 pickling cucumbers (I used 6 baby cucumbers sliced in half)
1 cup white vinegar
1 cup water
few sprigs fresh dill
1 tsp salt
1 tbsp pickling spices (I bought a pre-made one)
pinch red pepper flakes
1 clove garlic, lightly crushed (I used several)
1 tbsp sugar
(I also added a few hot peppers, sliced in half, for extra heat)

Chop the cucumbers into spears, slice the majority of seeds off if you have cucumbers with lots of seeds (not necessary for the baby cucumbers).  Put all of the ingredients except the dill, cucumber, garlic, and hot peppers into a jar; cover and shake.  Put the cucumber, garlic, hot pepper and dill into the jar.  Top with water if necessary to cover the cucumbers.  Refrigerate for at least 10-14 days before consuming.

Friday, September 2, 2011

Pina Colada Trail Mix


Last month, we went on a little road trip for three days through New York and Pennsylvania.  On the last day, we stopped at an outlet mall to do a little bit of clothes shopping.  We went into a store called Harry & David, which from what I can tell, is a fairly popular chain of stores that make food gift baskets.  I stocked up on their coffee because it smelled amazing!  We also bought a bag of trail mix there called Pina Colada Trail Mix and it was so yummy!  When we got home, we ate it all up and are unable to purchase anything like that here since we don't have any Harry & David stores in Canada.

I looked at the ingredients and it actually seemed pretty simple to make.  Also, the pineapples were sweetened with sugar (aren't pineapples sweet enough?) and oil was added to the mix.  I thought to myself....I could probably make this on my own just as easily, and without the added oil or sugar!  As it turns out, I could!  It turned out great, and as my fiance, Paul tells me - "Better than the one we bought!" which definitely counts for something!

So, without further delay, here it is, Lauren's Pina Colada Trail Mix!

1 bag of dried pineapple, chopped (found this at Whole Foods, any kind of dried pineapple will do)
shredded coconut
macadamia nuts, chopped
almonds, chopped
cashews, chopped

I chopped all of the nuts and the pineapple into smaller pieces, put it in a bowl, and mixed it together.  That's it!  This trail mix will make you feel like you're on a tropical island!  Mmmmm!

Thursday, September 1, 2011

Garden Fresh Salsa Recipe


Happy September everyone!  The summer has just flown by, hasn't it?

We have an abundance of fresh tomatoes and hot peppers growing in our garden, I've made a few batches of this delicious salsa so far this summer.  It is a really easy recipe that doesn't require too many measurements - just keep adding veggies to the mix and taste for your preferred level of hotness from the peppers.

I used a few different types of tomatoes in this - a couple of roma tomatoes, a handful of cherry tomatoes, and these really tiny "wild" cherry tomatoes (an heirloom variety I had growing this year).

Here is the recipe!  Nothing set in stone as you can add more or less of the ingredients that you like!

6 roma tomatoes, or handfuls of cherry tomatoes, chopped
1/2 large red onion, chopped
3 green onions, chopped
4 cloves garlic, chopped
2/3 cup fresh cilantro, chopped
the juice of 1 lime
a couple of fresh hot peppers, chopped (we used Cayenne and Chinese Five Color Pepper from the garden)
a splash of white wine vinegar
salt to taste

Walk For Farm Animals


After visiting Farm Sanctuary, I've been reading online and visiting their website to see if there are any ways I can assist with their fundraising efforts.  Right now, Farm Sanctuary is preparing one of their big fundraising initiatives, the Walk For Farm Animals!  Not only that, but Canadians are also pitching in with a walk taking place right here in Toronto!  I signed myself right up for this one as I would love to do some fundraising for this wonderful charitable organization.

I will be walking as a "Virtual Walker" which means that I will not be attending the official Toronto event as the date clashes with my work schedule.  I will still be doing a walk here at a local park in Mississauga on a date close to the actual event on September 24th.  I'll write all about it when I'm finished!  The walk in Toronto is 1.75 miles but I'm going to make this walk a full 5km (3.10 miles)!

I would really appreciate any donations if you would like to sponsor me in this event.  By clicking the above button, you will be taking directly to my fundraising page, where your donations will go directly to Farm Sanctuary.  Any donations are appreciated and the rescued farm animals will be thankful for your support!

It would also be fantastic if you wanted to participate in the event and raise some money as well for this worthwhile cause!  You can sign up as a participant in a city close to you, become a Virtual Walker in your city like I did, or "Sleep In For Farm Animals" where you'd like to raise money but might be a bit too busy to take part in a walk. 

Thank you so much for your support!